Here's a fab email we got yesterday from Lois and we thought we'd share it with you!
Hi Ladies
My envelope punch board arrived yesterday - thank you , I already don't know how I managed without it!
I love making envelopes to match my card theme and often use old
calendars and that can make the positioning quite tricky to get the
picture in the right place.
I thought I would share a little template I have made to make that easier. Photos below:
1. I made an acetate template on the envelope punch board of the sizes I
use a lot. I used an OHP transparency (but a clear cover off an old
report or any clear plastic sheet the right size would do).
I made an envelope on the board just as you would with paper and then
used a permanent marker to trace over the score lines. I like to square
off the bottom back flap of some envelopes so popped on a cutting line
for that.
2. Then I could place the clear template over my picture and work out
if my envelope would fit and how I wanted to position the picture. I
marked the outline and then cut my paper. You can see that I was able to
position the envelope to avoid the hanging hole on one piece and still
get the picture in the correct place on the other as I could see where
to square off the back flap.
3. I was also able to use the template to check I had positioned the
paper in the envelope maker so that the picture would be in the correct
position on my envelope.
4. All that was left was to cut and score and I had my lovely envelopes!
Hope the photos help explain.
Thanks for your fantastic service and I love seeing what you are up to on Facebook too.
regards
Lois
THANKS LOIS! We appreciate you giving us this tutorial.
Enjoy the envelope maker everyone. We just had to order another 50 - so click here if you want to purchase one!
Hi everyone, Jo here with a post for Artfull Crafts, and using Enchanted Garden, the new release from Kaisercraft.
As soon as I saw this range I knew I just had to have it. I have managed to make three projects with my kit. The first of the projects is a layout of my daughter when she was little. Enchanted garden is released in July, so it should be in store any day now.
I loved the pretty pink colours in this page, but with the hint of greens and some red/orange as well it was really easy to add other colours in. I had the die cut page, which I matted with a green card stock to give it more definition. This is the third project I did, and I had used most of my stash on the others. So it was a matter of adding bits and pieces to make the layout. I used some Prima flowers, as well the resin mushrooms. I added in some fairy floss ribbon roses from Kaisercraft. I added some Zva bling, and then some extra Kaiser rhinestone.
Finally I added a few other flowers and embellishments, and some white feathers to soften the page.
Enchanted garden, definitely a favourite of mine. .
Good morning all - Betsy here this morning on a lovely sunny Winter's day after the nasty week we had last week, weatherwise!! Trust you all survived the cold and were able to keep warm.
Today I am going to share some cards I have made with the gorgeous True Romance collection from Kaisercraft - another one of my MANY favourites!!
Now ladies, I am very sorry that the photography is not really up to standard but the weather has been so bad that I had to do my photographs inside and I find it is never as good. Does give you some idea of what I did though. Maybe, clicking the photos will give a better image.
The countdown is on now at Artful Crafts as SENZ is looming up fast! The pallets are to be packed and away by Wednesday, Liz and I are off to Australia next Saturday for the Kaisercraft Retailers Days which are on Monday and Tuesday next week. We are so looking forward to both events and meeting all you lovely ladies again.
I don't know if I will get another blog up before we go but will certainly catch you up when we return home.
With special blessings to you all, happy crafting and keep warm,
Blast Off is a neat Collection for Boy layouts and cards. I have used kraft card stock for the base background and then used Collectables and patterned paper for the banner.
Bakers Twine is great to use on a boys layout - I have wrapped it a round several times to add dimension.
Using up leftovers to make a card after creating a layout is something I love to do! So here is a card I have made using some Blast Off leftovers...
Good morning ladies - Betsy here today on a cold wintry morning. A great day to be inside doing crafting!
Firstly, I must apologise for missing my day on Saturday, as I was to have put up a blog post. Sorry about that, but having had a lovely day out with my friends on Friday, it just completely slipped my memory. We actually did a trip down to Riverstone, which is just north of Oamaru and had a great day, with lunch at the famous restaurant. I can really recommend it for a fabulous day out!!
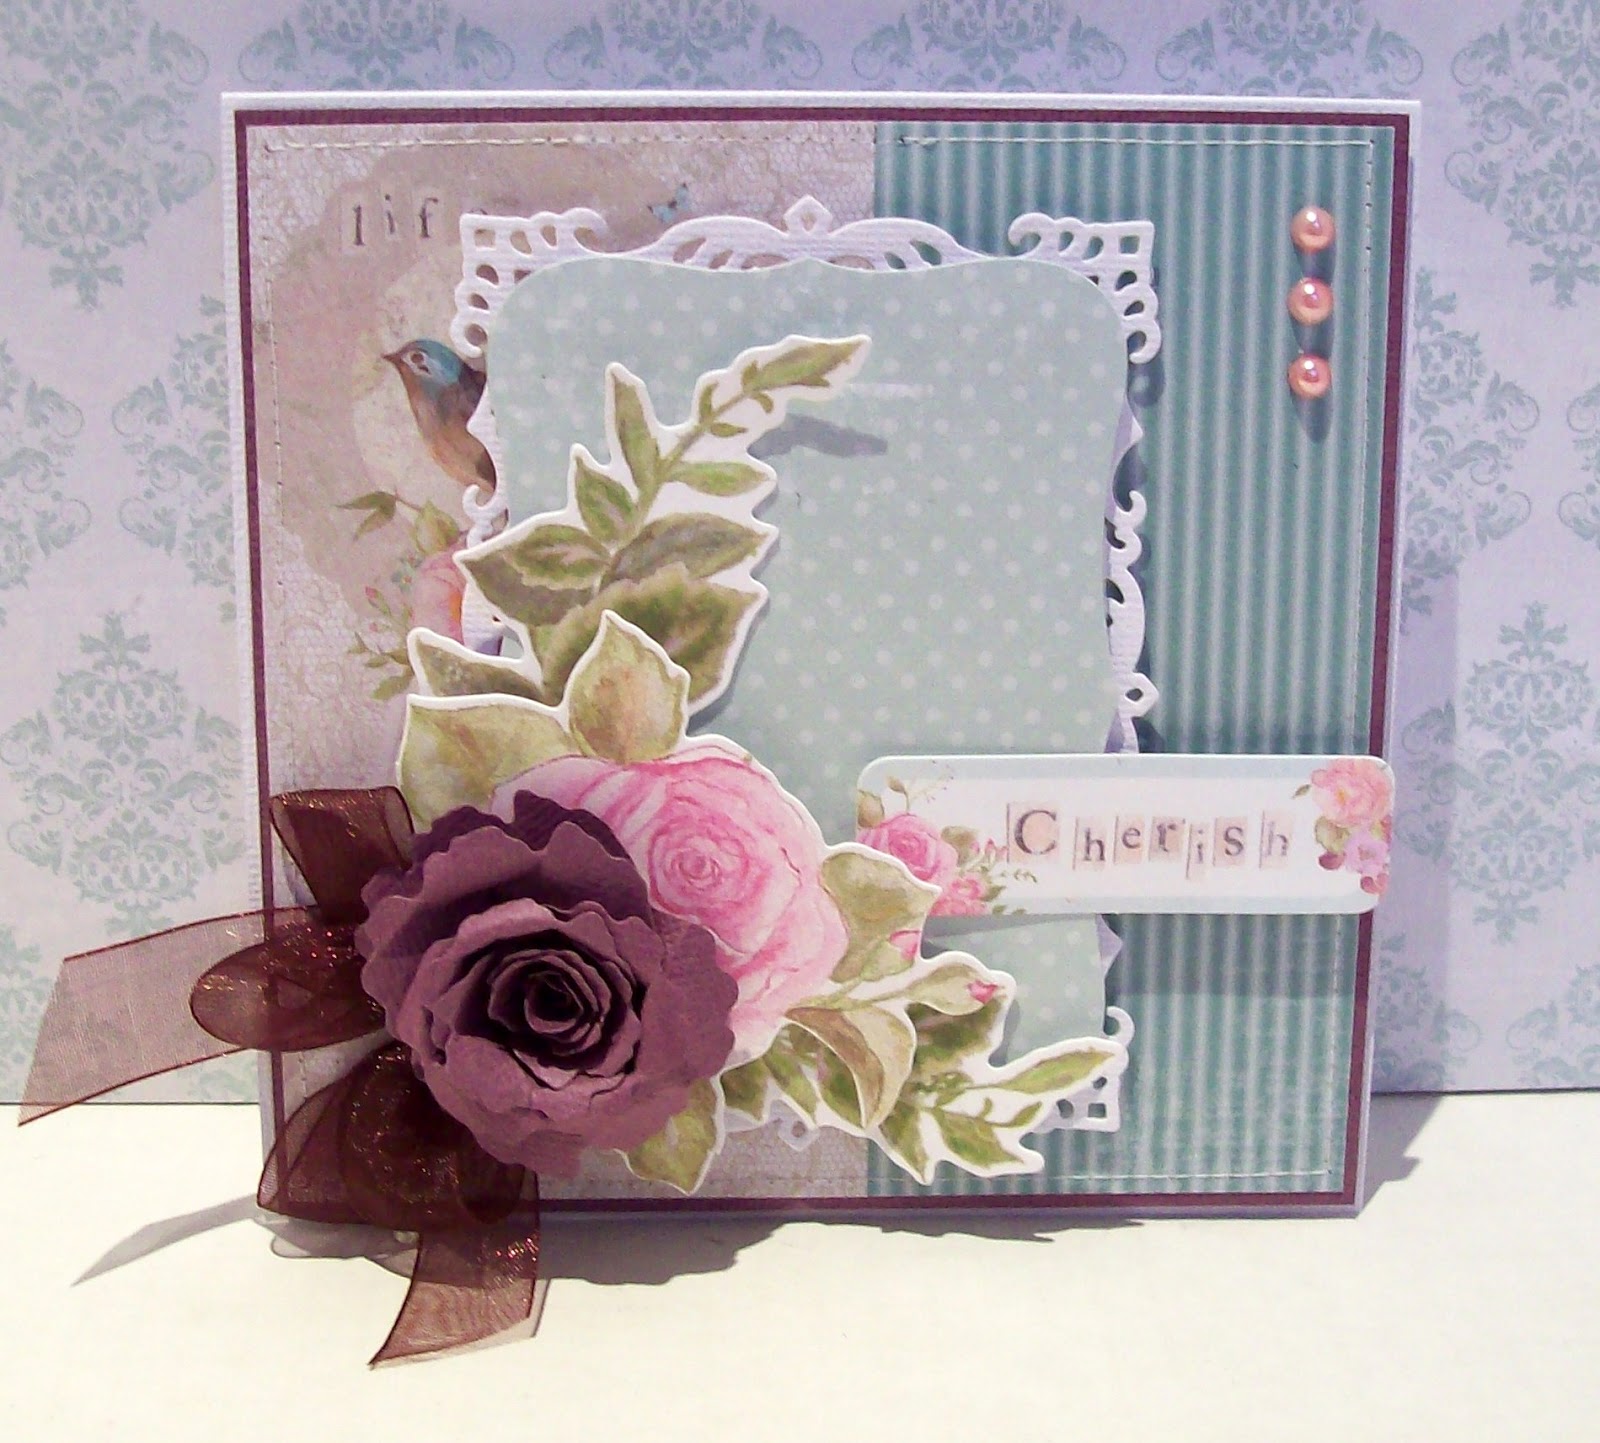
I would like to share a couple of cards which I have made for no particular reason other than, I love making cards!! Do hope you enjoy.
Last year when we were in Australia, I picked up some lovely flourishes etc and so I have used them on this card. Otherwise it is very simple, using a Martha Stewart punch for the borders. The flowers are from Prima.
This is made with one of my newer dies, Couture Creations, CO723224. It lends itself to making a very quick card. The These Days collection from Kaisercraft was used and the flowers are Kaisercraft's as well. Artfull Crafts always have a wide selection of Kaisercraft products, in fact the biggest in the country. Don't hesitate to contact them if you are needing anything and they are also very happy to order, if not in stock.
Remember the challenges at Artfull Crafts - there are prizes to be won!
All today ladies, happy crafting and many blessings,
Then I built up two embellished clusters : one around the photo, the other around the journaling. To link these two elements together I used chipboard film strips. You can cut your own either with the Die-namic Mini Film Strip Die or are punch it out of cardstock using the EK Film Strip Edge Punch. To add a subtle shine I gently dubbed some Brilliance Galaxy Gold ink onto my chipboard title.
To soften the page I added some textile elements around each embellishment cluster. I used the Sew Easy system to create the stitched semi-circles and then put some Das Plaster gauze around each slide frame.
The next step was splattering paint spots to tie everything together. I used a mixture of Adirondack Terracotta Acrylic and Charcoal Glimmer Mist. In the close-up you can see the more viscous nature of the paint resulted in nice round dots while the watery mist resulted in a more splotchy look.
Finally I want to share a fun idea for using washi tapes to make little dimensional embellishments for your page. Just cover plain buttons with tape, tear off the edges and use an awl to pierce the button holes. I had a lot of fun creating this layout and hope you'll be inspired to incorporate some mixed media into your next creation.
Other Supplies : Studio Calico (Atlantic Plymouth, Sundrifter Die-Cut Shapes), Crate Paper The Pier (Slide Frames, Splash), Basic Grey Basics Candy Buttons, Wycinanka chipboards
Hi everyone Jo here with another layout using Porcelain Rose paper form Kaisercraft for Artfull Crafts. It is a really versatile paper, I love the black and white look that comes with this paper. It was sharp and clean, so I decided my layout had to be that as well.
I started with black cardstock, and then just laid half a sheet of the music paper down, and then I used a few bits and pieces that I had sent to me from the same collection, I just cut them into rectangles and started to layer them around.
I didn't ink any edges today, I kept the paper sharp (no distressing at all). This kept the page sharp looking.
These flourishes I just inked with distress stain, and a Prima flower vine was added over the top, and I added an extra Prima flower in just to bulk the centre up a bit.
I even used a few left overs from other packs. The rubon girls at the
top of the layout and the word forever, the clock and the key were from other collections. So my sharp no fuss layout using Porcelain Rose from Kaisercraft. I love this paper.
Hi there, Christine here with some cards using Kaisercrafts Miss Empire Collection. All 3 collections are fabulous this month! Here are the cards I have made...
In the paper pad they have various fancy papers - metallic, embossed & glossy as well as normal ones. I adore the metallic ones! The first card uses the metallic bustier paper-gorgeous! I have used my new Spellbinders Curved Border One for the 1st & 3rd card, these are fabulous to use. The 2nd card uses Spellbinders Decorative Labels 8. Also I have used the MFT Sew Nifty die & stamp set. I love the dress form and like to paper piece it.
Waving a big hello.. Tracy here. I wanted to do a quick post to show you what I spent this afternoon doing. About an hour was colouring with my copics, then another hour fiddling around with the layout. I have used Kaisercraft - Vintage Timeless paper. I have had this collection for a while now, I don't know why I haven't used it before it's stunning.
Hi everyone, Jo here with the beautiful Porcelain Rose collection. I was really impressed with this collection, and I had the perfect photo to go with it. My friend said "Jo sometimes you should just do an easy page, so that I can just copy it. Mmmmm well okay, I could do that. See I think they are all easy, but I do get not everyone likes to fussy cut as much as I do.
For this page, I had the die cut page from Kaisercraft, Porcelain Rose Ivy, I adhered to the Cardstock, and then left the picture unmounted, but I did go back and add a touch of lace to the bottom of the picture.
I then built up the flowers on the page, with a ribbon. The green leaves were die cut and sent to me. I actually really like the die, and I used half on here and the other half on my 2nd layout, which I will share next week. I added a couple of die cuts from the collectables collection.
The words were from the Heirloom page. I inked around them and added foam dots to make them pop.
I think these words are perfect for my Mother n Law and Sister n laws photo.
Lastly I added a couple of bling brads to the top and the bottom of the page.
I hope you have stocked up for the winter ahead, and Porcelain rose is the perfect place to start.
Seems strange to be doing this in Winter when I can see snow on the mountains out my window! But I had fun doing this layout! This is of my great niece, Millie, who along with our dog, Meg, is watching her brother having fun in the pool!
The fence I made using a MFT die and then I tried to replicate a garden scene using the Collectables and some cute wee flowers. The butterfly is a Memory Box die -the Vivienne Butterfly.
Here is what we made at card class last month using this Sunny paper from this Collection. The cute box is from a tutorial by Becca Feeken found here.
Hello Tracy here today to show you a set of 3 cards using this months release Blast Off from Kaisercraft. What a fun bright range this is, not normally my style, but I loved it. All the cards follow this months theme "Files, Folders or Tabs".... They all have secret tabs... just the thing for kids to discover!
Firstly is this great little pocket card where I used Kaiser Collectabes for this Blast Off range. There were so many cute characters in collectable range, it was hard to choose which one to use!
Another character!!
And another character.....
Hope I have inspired you, and given you some ideas to play with this range. Until next time...
Congrats to our May winners
announced yesterday. We loved seeing your "Favourite Things". We hope
you'll join in our June and July Challenges... Yes, you read that
correctly! We are going to be in Australia and then off to SENZ at the
start of July, and so we'll continue with this theme for 2 months. Please make
sure you enter by Tuesday the 30th of July.
Challenge Theme - Flags, Flaps and Folders
I was inspired
this weekend by Teresa Collins and Heidi Swapp's fascination with
Flag's, Flaps and Folders. They are a fabulous way to add interest and
some interaction to cards and layouts. Why don't you create layouts, cards, projects and mini-albums incorporating any of the above and submit them for the challenge.
Here's a quick snapshot of some
of the projects I completed during the weekend. I promise I'll try and
do a whole blog post on the projects before this theme is finished!
Sketch Challenge
Sketches in Thyme have teamed with Artfull Crafts and have provided a sketch that you may
want to use for
inspiration. You don't have to stick to the monthly theme if you use these. Sketches are great for
cards or layouts - and are perfect for the time-poor crafter, or for
late at night when inspiration is lacking...
May Sketch Challenge
Prizes
There will be 3 prizes this month: 1) Overall challenge winner will win a $50 prize pack of File Folders, Flaps and Flags.
2) Sketch
winner will win a $30 pack of Kaisercraft's new Blast off Range (shown right)
3) New entrant winner will win a $20 gift voucher from Artfull Crafts
How to Enter
Entry is SIMPLE!! Click here,
upload your image, include a sentence or two and voila - you're
entered! Your entry will NOT appear immediately. We will have to
activate it from our end - which may take a day or two.
Alternatively, from our website homepage,
you can find the challenges and enter by clicking the Gallery Tab along
the top menu bar, then click into Competitions. They are all listed
there for you to view and enter.
We look forward to being inspired by your work!
Entries close midnight Tuesday 30th July (yes you've got 2 months) Maximum of 3 entries per person


 1) Overall challenge winner will win a $50 prize pack of File Folders, Flaps and Flags.