Thought I would share a couple of super easy tips for making your photos look better in 10 seconds flat!
There are a few free photo editing packages on the Internet - but I use the Google one called Picasa - downloadable from here - http://picasa.google.com/
It is easy to use and with literally two "auto-correct" options you can really make your pics look so much better. The key to success is cropping your pictures to focus on the subject matter and auto-tuning.
The auto-colour and the auto-contrast buttons are often all you need to use - though there are many other fine tuning functions available too. Here is what I mean!
(NOTE: Depending on your screen these might look very different or not that different! I could barely see the difference on my laptop - but on a PC they were very obvious)
1) LOVE Album
This was an OK picture to begin with but just look at the difference when you crop and use the auto-adjust buttons!
2) Crayons
Again - this was an OK photo to begin with, but all I have done here is use the auto-contrast and auto-colour options. Because it was taken outside, the brightness of the colours really shines through
You probably know that natural light is the best light for photographing but sometimes in winter - even here in sunny Marlborough it's hard to take good pictures as the winter light is very blue and dark compared to bright yellow summer light. Try a few spots around your garden and you can always use a piece of white paper as a background - then no-one will know you took it outside. I usually just find a good spot with a neutral background as it's quicker...
3) Cosmo Cricket Album
Another photo taken outside (this time in winter - you can see how "blue" the light is and this was taken in the middle of the day!) and again - a huge difference with 2 simple adjustments
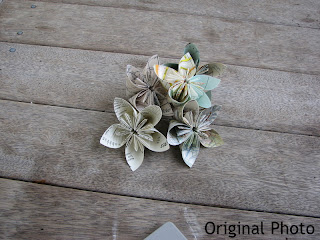
4) Map Flowers
It was so hard to get decent photos of these. We had three overcast days in a row and in the end I just did the best I could. Still - the cropping and auto options made a difference. I also increased the saturation (on the Effects tab in Picasa) to make the colors a little brighter
Since I have been looking at craft blogs I have seen so many with fabulous projects - but they look dull because of poor photography.
All it takes is a little bit of practice and these basic tips.
I should add that since I started on the Design Team I have picked up ALL these tips from others - so hopefully I can now pass them on!
Please leave a comment if you have any questions - and remember - if you are applying for the Design Team (see all the details HERE) then good photographs will greatly improve your chances :-)
Hi Everyone - Joanne here. Today I've got a few simple little tips to share that I have learnt over the years that have helped me a lot!
First up - Babywipes! These things are amazing! I always keep a packet on my desk to clean stamps mainly but they clean a lot more! I use them to clean down my desk also - they remove glue and paint with ease. Ive also heard they work wonders on things like GlimmerMist and even Vivids!
Nail files - If you are working with chipboard and don't have sandpaper or sanding files available try your trusty nail file. They also work great for distressing.
Problems with new clear stamps not stamping nicely? Try rubbing an eraser over the stamp, then ink and stamp on scrap paper. Repeat this a couple of times and you should have a lovely nice impression.
And last, but not least, if you don't have an block big enough for a clear stamp try using your Cuttlebug plates! I find the bottom one works the best because its large and doesn't warp in the Cuttlebug.
If you have any simple little tips that you love please comment and let us know!
The photo in this layout is of my mum and her sisters, taken in the 1940's. I decided to play with stamps and ink, taking a sheet of white paper and transforming it with lots of stamping and distressing techniques, until I ended up with the brown/black design. I pleated and stitched one section, threading beads onto the embroidery floss. I used a mask on the green paper to add extra detail. Liz now has this layout at the shop if you are interested in a closer look.
A tutorial for you.....
And my card made using the flower...
This is actually an easel card, but I forgot to take a photo before I gave it to Liz! Must have been having a blonde day.
Another tutorial, this time for simple rolled flowers.
A layout of my bestie and I on her wedding day. I used impasto scraped over Glimmer Screens (stencils) to create the lovely texture. This is a fantastic product which I love using. I then rubbed on some Perfect Pearls once touch dry and spritzed with Glimmer Mist.
I created a frame from acetate and used Tim Holtz Alcohol Inks and Metal Mixatives to colour it. The lace was coloured with Glimmer Mist. It's so pretty and shimmery in real life.
My Tuesday tip this week is - why not create some customised tableware (temporary but fun ) using rub-ons. You could easily take some small rubons you are not using and make a set of these up for a baby shower, wedding, birthday party etc
They are really simple and fun, but the great thing is that you could adapt them to any occasion. Rubons - Not Just for Paper!
These are NOT just for paper anymore - here are a couple of examples where I have applied them to china for a one-off occasion.
Christmas
(Rubons from Kaisercraft)
Valentines Day
Themed Party
Each of these examples is just a simple rub-on onto some whiteware. You need to make sure your piece is very clean - and use some window/glasses cleaner to remove all traces of grease before you start. Then simply apply as you would to paper - making sure you press firmly into all the corners. I find the china less forgiving than paper in this regard! When you are done using the piece and want to restore it to its original state, simply rub-off or use a craft knife to lightly scrape.
I have had limited success in trying this technique onto glass but it can definitely be done! Try Google for some good examples.
Now - you might have noticed that these are filled with some rather gorgeous chocolates.
Well - I made them and here is how!
This was SO much fun - and very simple. It is a little time consuming as you need to let the chocolate harden each time, but you could easily complete these in one evening.
You will need some white chocolate (I used Milky Bar), a chocolate mold and some POWDERED food colouring (I used ChefMaster). Do not be tempted to use any other coloring - it will not work and your chocolate will be good for nothing other than spreading on greaseproof paper, refrigerating and feeding to your family!
Simply melt the white chocolate and spoon into 6 molds. Add a pinch of color and spoon into 6 more molds.
Refrigerate to harden and then remove from molds. Add a little more color to the remaining chocolate, spoon into molds and simply repeat - intensifying the color each time by adding more of the power color. It's so easy and if it all goes horribly wrong - you just spread it out, refrigerate give it to the kids/husband/dog and start again another day!
Hi everyone, Joanne here with the Tuesday Tip for the week.
Over the last week or so I have been on a little personal mission to find easier ways to get journaling on my pages. Most of the time I dont seem to incorporate it into the design then when I'm finished I cant find the right place to put it on the page. My stack of 'finished but not journaled' pages is getting a little big for my liking! I'm sure there are alot of you out there that are having or have had the same problem - so if you have any ideas please comment and let me know!
So I would like to share with you a few little tips that have helped me get more journaling onto my pages.
Hand Journaling
I know it might sound really simple but Ive heard that a huge amount of scrapbookers are too scared to handwrite on their pages for fear of making a mistake or 'ruining' their layout. I used to be one of them until I was watching a presentation online that spoke about leaving pieces of yourself for your family for after you have gone - and handwriting is a big part of who you are. Imagine if you had just a paragraph of your great-grandmothers handwriting - I know I would treasure it, as most people would. Handwriting your journaling is also the easiest and quickest way to get it done. Heres an example I made a few months ago:
Banners are a huge trend at the moment and here I have used the banner to anchor my hand written journaling.
If you just cant bring yourself to write on your layouts or dont like the look of it - write on the back of them. Ever since I had my daughter I found my memory just hasnt been able to keep up and Im scared of forgetting all the little things - so now when I complete a layout I write the journaling in pencil on the back of the page. That way when I get around to typing up all the journaling its right there for me, and also if I never get around to doing that the journaling is still there on the layout.
Computer Printed
This is one of my favourite ways to journal but it can be quite time consuming. The time it takes for me to do it this way is why my stack of to-journal pages has gotten so high! I dont have access to our printer via my laptop, I have to use my parters computer if I want to print, which can be quite a hassle (hence the influx of hand-journaled pages recently!).
Heres a little sample of typed journaling that I have cut into strips:
Products and Other Ways
There are alot of products available to help you with your journaling. If you like to make your own embellishments there are alot of stamps on the market that can help. These new Kaisercraft stamps are perfect if you have school aged children - but if you dont have kids at school you could be very creative when you ink the stamp and use a baby-wipe to remove the ink off the parts like where the middle stamp says "Subject, Grade, School" etc.
You could also write on these tags and either incorporate them into your layout or hide them behind pictures and other elements.
My post is getting a bit long now, but there is alot of other product in the Artfull Crafts store that would be great for journaling so I will just link a couple more up incase your interested!
Oh, and before I go, one last thing :) If you just cant find the words for your journaling - ask someone else to write it for you (like your partner or your children). Its great to have someone else's perspective on an event/photo. And it might also just connect them into your memory keeping just a little bit more :)
Hi, It's Tina here with my "love" blog post! I'm not really one for too much lovey dovey stuff, so I thought I'd tell you a bit about a product that I absolutely love, Tattered Angels Glimmer Mist. This is seriously gorgeous to work with, plus you can get messy (which is half the fun!)
A few tips...
* It's very easy to clean up, just rinse with water (but the darker/stronger colours will stain your fingers)
* You don't need to use alot. The glimmer starts to show as it dries, so you don't need to soak your paper (which is a common mistake, and wastes alot of the product)
* You can wipe off the excess, but this also wipes off some of the glimmer. This comes down to personal preference.
* Use a cardboard box as a spray booth.
* Holding the Glimmer Mist bottle close to your item will give a strong concentration of colour, holding it approx 20-25 cm away gives a light mist.
* Use it to custom colour your flowers (see below), doilies, and laces (as on the layout above).
* Works extremely well on absorbant materials such as paper, chipboard, & fabric, but it will eventually dry on other materials.
* Spray over stencils and masks to create your own patterned paper.
* Custom colour white cardstock for a unique effect. Stamp with the Glimmer Mist as I've done with the butterfly on the layout below.
* You can also use the "left-overs" from Cricut cuts, or chipboard letters as stencils.
* Press the nozzle quickly for a finer mist or slowly to create more "blobs" when spraying.
If you're wondering which colour to try I'd suggest gold (which goes with everything), or chosing a colour you use often in your scrapping.
