Today I am sharing a few quick cards that I've made using Kaisercrafts 'Party Time' range.
I have a few birthdays coming up and not alot of free time for crafting. Using the Kaisercraft Party Time Collectables set, my cards came together very quickly, about 5 mins per card.
I've finnished each card off with Nuvo Crystal Drops. I've used English Mustard, Rhubarb Crumble and Morning Dew to give each card a little extra POP. If you like using pearls, rhinestones, enamel dots and bling on your projects, then Nuvo Crystal Drops are for you. There are heaps of different colours to choose from, including glittery ones, they dry hard like an enamel dot on your project and they are nearly impossible to mess up.
I have been playing with this Kaisercraft UBud Dreams range this week - in my element as the blue/teal is one of my favourite colours. Here is a layout I created using these beautiful papers:
Using a card stock as my base I have cut down the reverse side of the Mandala paper and distressed the edges. I have then used a stencil and texture paste to create the mask. Once this was dry, I then used two different inks - a green one and a blue one to spray over the page, and created some splats with both colours. I cut out a frame from the Sekar paper and also cut out the mandala from the Bayu paper - these are placed behind the photo.The paper in the tears is the Citra paper. The stamp is from an older range of Kaisercraft but the clear stamps available with this range will work just as well. I have then used some of the stickers off the sticker sheet and some of the collectables.
I promised you the pink version this time round ;) so I hope you're not disappointed with this selection!
Some crafters find cards hard but really they're just mini versions of layouts, and just like layouts they can be as simple or as arty as you like. Today I was in a clean and simple mood :)
First card up is a simple base with 3 layers of paper and cardstock. The balloons were from the sticker selection - to give them definition they are layered with foam tape either one or two pieces and silver thread attached.
I always decorate the inside of my cards - it helps it stand up!, if the front is heavy with embellishments ;) and it makes it look finished, tying it all together.
My second card is another combination of layers of papers and cardstock. The large flag is part of the collectables. Some thread and distressed muslin tucked in behind with some flowers finished it.
The inside is again decorated, and this view of it allows you see the dimension of the card - the flag corners are curled which just gives it a bit more oomph ;)
The last card I have to show you is made with some scraps - never throw them out they can come in handy ;) 3 strips of paper created the base of this card, simple as that. Pop on a doily, twine and a cluster of embellishments and its done.
Here is my take on the Kaisercraft High Tide range. A great range to work with in lovely neutral tones - and ideal for cards, layouts and mini albums. I decided to make a mini album - this wee album is all of 4" x 4" - and very easy to put together.
This little mini album took only two pieces of 4"x4" chipboard and 1 piece of cardstock to make. I cut two strips from the cardstock and created a concertina effect.
The pages were then decorated using the 6x6 paper pad pages, the die cuts from the paper pad and the collectables matching the range.
Here a just a few ideas of the double pages created in the little mini. I then used a piece of denim and created a belt effect to close the album.
In my Dt kit I received the new - or maybe not so new now! - Kaisercraft collection, Party Time. After flicking through what there was I divided it into two sections, the pink and the aqua/blue, and for this post Im showing you what I created with the aqua/blue papers in this collection.
Ive used a simple recipe for all three layouts - paint splatters and stamping for my backgrounds and layered embellishments. For this layout I dry brushed white gesso over the background and splattered paint around, before adding random stamping.
The chipboard stars I altered using white ink and while still wet randomly sprinkled embossing powder on. A few enamel stars from my stash and some thread finished it off, and by popping the photo and the title up on chipboard it gave the whole layout dimension instead of leaving it all flat.
The second layout uses the same recipe, although this green base page is from Mister Fox ;) not Party Time but it tied in beautifully! The speciality paper for this collection was a 12 x12 sheet of die cut circles - I didn't want all of them on my page so I trimmed around the ones I wanted, separating some of them from the main section.
Again as with the first layout I used paint splatters and random stamping, after first priming the paper with clear gesso.
This layout was pretty simple and believe it or not actually took the longest of the three of them! The sprays I used are Lindys Stamp gang and theres a selection of these in the shop.
The final layout to show you today used what I had left over. So the base is just plain white cardstock, more paint splatters and more random stamping.
I love this layout :) its my favourite of the three, possibly because of that cute little great nephew of mine :) :) and its a very clean and simple page, not like me at all! ;)
So, Party Time?
You wouldn't have guessed it from these pages would you?? and thats one thing I love about scrapbooking, taking something and making it your own.
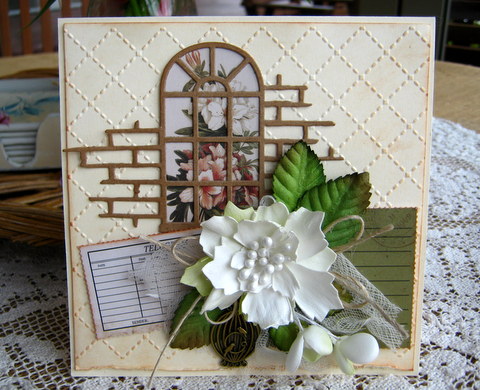
The 3 cards show case the Kaisercraft Arched Window die - love it! I cut out some patterned paper to put behind each window and cut 2 lots of kraft for each window and layered them together, this raises them up a bit to give some dimension. Using my green tombow glue in one of the new fine tip bottles works so well in doing this!
The backgrounds have been dry embossed with a brick wall pattern and below a lattice design.
Each card has a floral grouping of a Cherry Tree Lane letter and my handmade foamiran flowers - these have been awesome to make and I just love the effect of them.
Aw - isn't this just the cutest, cutest range .... Kaisercraft Peek A Boo (even the name of the range is cute!) Sadly my children are all grown up and most of my baby photos are all scrapped - but I have managed to find a few to add to my exploding box and tell a little story of my gorgeous boy (who turns 24 in April) ....
I used the papers - Kid,Precious,Cherub, and Bambino to decorate the box and each of the box's page. The Cherub paper is perfect for mini albums and pocket pages - as one can cut up the page for pockets and tags.
The bunny on the bottom left picture above was fussy cut from the Specialty Paper - Our baby boy (varnish) - it's quite an awesome paper this, as it quite thick like cardstock and allow you to complete details of your baby (the girl range has one too) - perfect for a 12 x 12 album.
Hi all. I hope that some of you are enjoying some sunshine. Here in Levin, we're still waiting for summer to make an appearance. The good thing about bad weather is time indoors to do a little crafting. I am attempting to finish a few projects that I started at the end of 2016.
The tutorial I used to make this mini came from My Sister's Scrapper. To make the album itself, you only need 1 sheet of 12x12 cardstock. I used an extra sheet of cardstock for photo matting and the belly band. All patterned papers and die cuts came from the 6.5" Peek A Boo paper pad.
Well, I'm off to freshen up my cuppa and finish a few cards while the weather is terrible. Thanks for stopping by :)
These two cards are the same design but I used different papers from the pad for the background. The strips of paper left over I swapped and used on the other card. So it meant I didn't end up with leftover pieces of paper!
It is a little into January now but wishing you all a Happy New Year for 2017!
Here is a layout using the lovely "PS I Love You" range from Kaisercraft - how beautiful. soft and romantic this stunning range? I love the soft pastels in pinks and greys - and the lovely butterflies.
I have used some of the papers from the 6 x 6 paper pad and cut to various sizes and distressed these, and others I have punched the edges. The papers have then been layered randomly. I have masked two butterflies with gesso using some pink ink to give it the pink tinge and I have used the same paste mixture on the chipboard flourish. The chipboard has also been covered in glossy accents. I also used the same paste mixture on the wooden hearts. The layout is finished off with some of the collectables available in this gorgeous range.
Thanks for popping over and wishing you all a wonderful week!