After viewing all the lovely projects made by the Design Team, I hesitate to add my contribution. Liz gave us all the same bag of goodies and the challenge was to use what we could, as the mood took us. Some amazing ideas surfaced and of course, they were all different. Well done to all the team.
Of course, my brain never thinks too far outside the square, hence a couple of cards..
A 5 1/4" square card and I have used Marianne Craftables Die, CR1251 to cut the frame. The rose was handmade using Spellbinder's Spiral Blossom 1, also the leaves were cut using Spellbinder's Foliage Die.
I used Spellbinder's Labels One Die to cut this card, making it into a framed window card which has a base for standing.
That's it today ladies. Sorry I have dragged the chain on this one, but my goodie bag was hiding under the counter at the shop for some time and have just recently retrieved it. Hope you have enjoyed viewing all the different projects that our wonderful DT have produced. It is amazing what a difference can be achieved using the same products, isn't it!?
By now you would have all seen the DT kit Liz sent all of us. From mine I have created a mixed media layout and with the scraps a card. Hope you like :)
First up is the layout.
Last year my friends from nursing all got together for a weekend away in Hanmer Springs and we worked out it had been 15 years since all four of us had been together. Such a fun weekend and lovely to know that we all got along like we were first year nursing students again :)
I created the background by dry brushing on white gesso and then layered a script stencil over the top with black gesso. A bit of random stamping with several stamps and distress glitter and the background was done.
Here you can see the different layers and the jumbled black thread I threw on there as well. The white button was one the Artful Embellies - I stamped the reverse of the button with stazon ink.
Another little close up for you. I love those circle stamps from Finnabair!
Heres the card made from the leftovers. Simple but effective! The lily is one of the Heartfelt Creations stamp and die sets - Liz can get these in for you ;) - this was the first time Ive attempted to colour them, I used pencils and blended the colours with baby oil - theres a great tutorial on pinterest to do it :)
Hi all, Diane here. It's been a crazy few weeks. A lot of late nights and all thanks to this little challenge. Don't get me wrong, I'm not complaining. I loved it all, the challenge, the late nights and the messy craft table. It was all worth the look on my daughter's face when I finished.As you already know we were all given the same kit to work with from Kaisercraft's True Love Collection
I decided to make an exploding box for my daughter using the green cardstock as the base and the black cardstock as the lid. I used Lindy's Stamp Gang sprays "Merry-go-round Green" and "Raspberry Lemonade" to shade the white cardstock so it would match the project. I really like using Lindy's sprays. They would have to be one of my 'must have' products.
I experimented with the metal leave and the sprays to try get a leave design on the card stock but it wasn't too effective. If you look closely you can see it - worth a try.
Most of the embellishments provided I used on the lid or for my center piece inside so I had to improvise with what I had left over to make my own butterflies, flowers, lace etc to embellish the tags, around the outside of the box and the inside pages.
I really enjoyed completing this challenge but I think the part I have enjoyed the most is seeing the amazing ideas the rest of the design team have come up with using the same products.
I was so excited receiveingmy parcel - it arrived at 7am - and the end of the day from work could not come fast enough so I could start my first challenge on the design team.
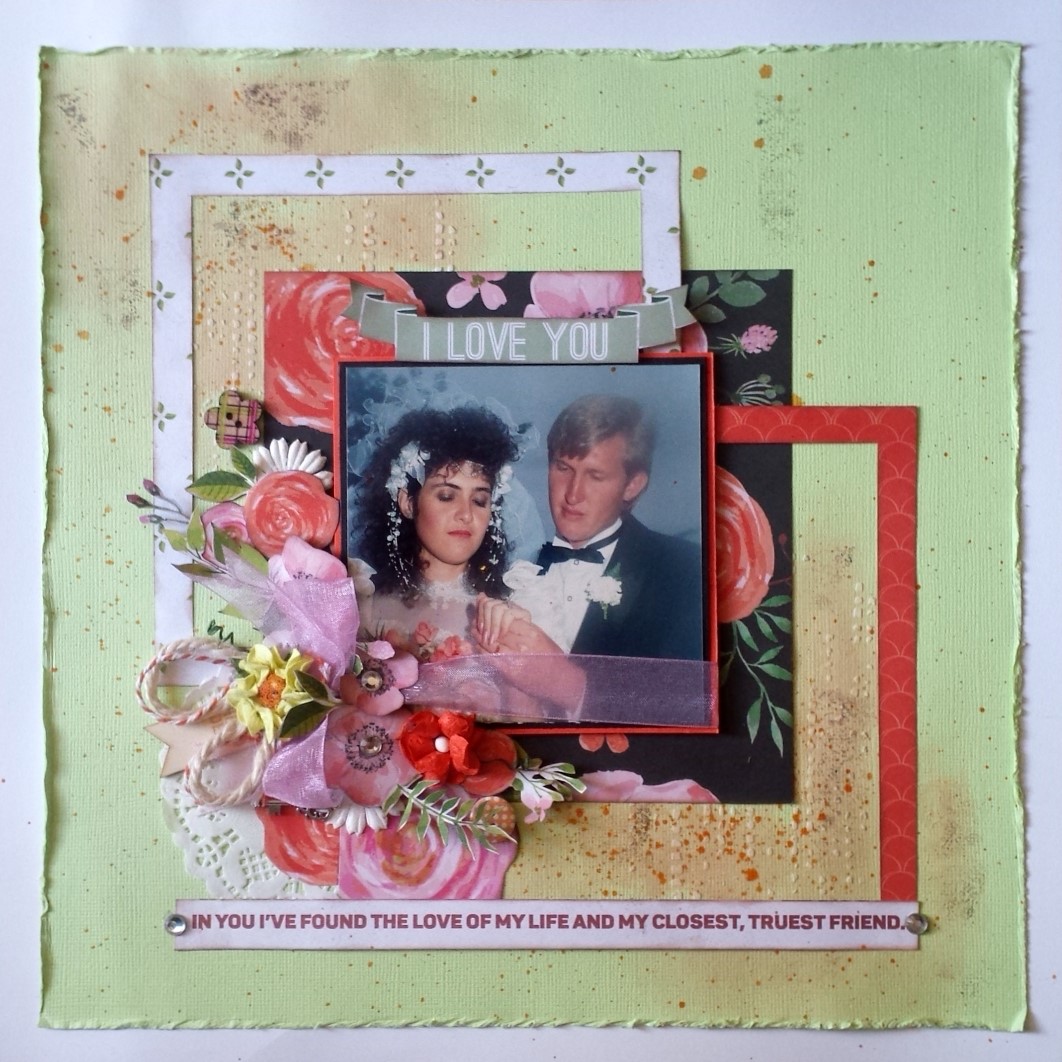
And happiness is .... flowers, ribbon ..... pretty colours ......
For my first layout, I used the white cardstock as my background. I then cut down and distressed the edges of the green cardstock. I have used a little gesso and masked with a patterned stencil and then splattered a little orange ink on the green. I mounted the photo on black and orange cardstock. Cut square frames from the True Love My Sweetheart paper and the True Love My Friend paper, used a 6 x 6 piece of the True Love My Love paper. The I Love You Banner was cut out from the heart on the True Love My Dearest paper. The sentence at the bottom of the layout was taken off the bottom of that same paper.
Next I fussy cut some flowers from True Love My Love paper, which I then arranged with the ribbon and flowers that we received.
Hi. Vonni here with our first Design Team Challenge for 2016.
The Design Team were all given the same mini kit full of cute embellishments and some lovely papers from the Kaisercraft True Love collection.
The challenge was to create anything we like using the products provided. I knew immediately what I wanted to do with my kit. I have being playing alot with my Silhouette Cameo and found a cut file for a shadow box from designer Lori Whitlock.
The shadow box took 6 sheets of white cardstock to create. The cameo did all the cutting and scoring, which left me to do the folding and gluing. Lori Whitlock has video tutorials on You Tube for her 3D projects so it was fairly easy to construct.
Using the embellishments and papers from the kit, and a little bit of black ink, this is what I came up with. I am thrilled with the end result. Now to find somewhere to hang it...
Hello there! Lisa here, with my first DT post for the new 2016 team (although I'm still the same old me!) Liz set us all a challenge: to use an identical package of goodies and see what different creations each of us could come up with. Projects like this are always a lot of fun, because it's cool to see how different people utilise the exact same products and come up with fresh new ideas and designs.
This was the selection of products we were all assigned: a fabulous array of papers and embellishments from Kaisercraft's True Loverange.
With my pack, I put together a couple of layouts. My first uses a pale lime green cardstock as a background, upon which I've layered some doilies, and a section of the My Preciousdesign-- love that botannical look! I added my photo on top (the husband and the fur kid on the bridge at Saltwater Creek walkway), and then placed a cluster of embellishments on the left- including some wood veneer and a word tag I cut out from the My Dearest sheet.
I distressed the edges of the papers, and then finished off with some ink splatters to tie in all the darker-coloured elements and balance the touch of florals with a masculine element. :) A closer look is below:
My second layout has white cardstock as the starting point, and then a mixture of the My Darling, My Friend, My Sweetheart, and True Love papers pieced together to form a central base and frame for my photograph.
Again, I distressed the edges of the papers (using this fab wee gadget here) and added embellishments in the form of a doily, some paper flowers, a tag, some ribbon and a wooden veneer piece. I also added a few extra flowers I fussy-cut from the True Love sheet. The word sentiment was cut from the selvedge edge of one of the larger sheets-- I love how Kaisercraft include extra little elements like that in their collections. :)
A couple of closer shots are below:
And that's it! You can find the True Love collection here, and make sure to check out thr blog over the next week or so to see what other wonderful creations the rest of the design team come up with for the challenge. :)
As always, thanks for looking and I'll see you again soon!
Debi here, excited to be posting my first official post showcasing something new for the DT challenge, which contained a fair few goodies!
I have to confess, these colours and papers wouldn't of been part of my normal choices, but that's what makes a challenge, right?
I made 2 things; first up a 12 x 12 LO.
To soften and grunge the red, I added some white paint - heavily stencilled on, this softened the red but also added some extra texture.
12 x 12 Layout
I've then distressed, layered and added gold paint to highlight and frame the photo. Finally adding the pretty flowers and the pretty bits and bobs, including some extra ones I made with some of the red cardstock from the kit.
Details
I do love grunging things up a bit, so to tone down the colours of the flowers they got similar treatment as the paper, some white acrylic paint and then some glitter.
detail, handmade roses
Detail, Layers
There was still quite a bit of paper left, so I just quickly through together this little kraft gift bag, some some of the scraps. Easy to do, but I think very effective.
Gift bag
I had fun creating these 2 creations, I hope that you are all enjoying the last days of Summer, until next time, Debi x
Hi everyone
Now that we've finished welcoming the Design Team for 2016, we've got them started on a challenge. Everyone on the team has been sent everyone the same mini pack of Kaisercraft True Love papers and coordinating embellishments.
The team have been given complete freedom to create whatever they like with the kit, so we're looking forward to seeing a mix of cards, layouts and projects. Follow us on this journey for the next 2 weeks and find out what style our designers' prefer.
We have also sent a pack to the winner of our Facebook competition and and she will be our guest designer, featuring on the blog later this month. We can't wait to see what everyone comes up with!
Hi all!
I am really excited to be on the Artfull Crafts Design Team. I am also part of the ArtfullCrafts staff, working there since 2009 Or should I say I have been a customer since 2009 as my wages go right back in the shop. I am sure that is why they still keep me around lol.
I am originally from Los Angeles California and moved to Temuka 27 years ago when I married my kiwi boy Calvin. We have two fur babies Oscar a Dalmatian and CJ Pusspuss Patrick our 15 year old Tabby cat.
I started scrapbooking about 12 years ago and that of course has lead to card making , project life layouts, mixed media projects, making mini albums from scratch and I love coloring with my copic markers so much so that I own 216 markers ouch! Don't tell my husband lol.
Where do you get your inspiration from?
I get my inspiration from pictures I take and believe me I take so many photos. I love finding the right paper for the picture. I also love looking at Pinterest and different blogs for ideas. I enjoy looking at Gabrielle Pollaco and My Sisters Scrapper on you tube, where before I know it, I have spent 2-3 hours.
What are your favorite brands?
My favorite brands are Graphic 45 (although I'm my of a collector as the papers are way to pretty to cut) Simple Stories, Tim Holtz, Prima , Imagine If chipboard and of course Kaisercraft .
What scrapbooking tools/products can you not do without?
My scissors, tape, Tim Holtz ruler and my copic markers. As I mentioned before I have over 200 of them.
What do you hope to try or improve on this year?
I am going to try and be more adventurous and not be a perfectionist lol. I have to be willing to get dirty and use more sprays, gels and pastels.
I must say doing Finnabair's class in March took me out of my comfort zone and opened my eyes to a whole new world of mixed media projects. I loved it even though my bank balance might not.