Gosh, the time is just flying by, here we are already just 3 weeks from Christmas.
Silent Night
Today, I'm sharing with you a little gift set of cards, tags and gift box made with the lovley more traditional Christmas Kaisercraft Silent Night Collection.
Cards
So easy to create cards and tags with Kaisercraft collections. Heaps of traditional goodness in the Silent Night collection.
tags
These tags were created using the die cuts, and trinkets and jazzed up with some left over lace and foil washy tape.
Hi everyone, Debi here; today I'm sharing with you a tag card book that I created for a colleague leaving work. These tag books are pretty simple to make, and easily can be adapted for lots of different uses.
Front cover
I've used the absolutely gorgeous and pretty unique Graphic 45 Voyage Beyond the Sea Papers. I just love this collection, vibrant in colour and details.
My English colleague is returning back to the UK, so it felt appropriate to use lots of voyage and Kiwi symbols.
Front cover
I also decorated the back inside cover with a few details, all the details have been added with chipboard and then painted and sprayed to blend in.
Inside Back Cover
Then onto the inside, I've decorated each tag, by sponging with Distress inks, various stencils and sparkly watercolour details to really make them pop. I used various sentiment stamps from my collection to complete the look.
first page
I added a few photos of his time here in New Zealand, and left plenty of space for everyone at work to leave their farewell wishes.
middle pages
back page
Everyone loved it, and I love how it's created a real memory of his time with us.
Have a great week, as the leaves are falling and autumn is truly here.
Christmas is coming - and fast! Nichole here with a Christmas Tag. Can you believe it's December already? Hope you're fully enjoying the Christmas Countdown and all the projects we have on offer!
Here's a special tag for any present under the tree - whether it be for a loved one - or yourself!
These gentle muted tones inspired me to do a bit of a distress look. The background is dark green and has been painted over with Folk Art Crackle Medium, and then finished with a quick coat of white acrylic paint. It crackled so nicely!
Some washi tape along the bottom makes a nice golden contrast against the dark green. Snowflakes were stamped in Colorbox White Pigment ink to float above the other elements.
Some Diamond Stickles to this Kaisercraft Merry and Bright die cuts gives these berries a bit of frost and sparkle.
A small pompom was made from red and white baker's twine, fluffed and trimmed, then glued down on top of the tag string.
And it IS beginning to look a lot like Christmas!
Thanks for reading, and hope these Christmas Countdown projects continue to inspire you to create and to celebrate the Holidays!
Hi Everyone. Lisa here. Today I have some altered tags to share. I have decorated them using the gorgeous Sweet Day collection by Echo Park. This month at Artfull Crafts the focus is favourite colors. I have so many favourite colour combinations, there is no way I can commit to one! I do love the colours in this range, they are fun & so pretty!
I have used purchased luggage tags. You can usually get these from your newsagents or stationary store.
I love to alter them, they are 'my thing' at the moment.
I have decorated 3 as a set, you can add them to a layout, a card or just give them as they are.
I have layered elements from the sticker sheet, used some punched shapes, buttons, crushed seam binding & bling.
Inked edges help give a finished look.
I have used some flowers from the sticker sheet to replicate the images on the patterned paper. I cut a sweet little envelope using a sizzix die I have. Some more inked edges, ribbon, buttons & bling.
I used the gorgeous hot air balloon from the sticker sheet layering with foam tape & a sentiment. Some ribbon, twine & bling.
Hi Everyone. Lisa here. Today I have a layout to share using Kaisercrafts' Great Southern Land range.
If you haven't seen this range yet, you should really check it out! It is such a versatile range. It is ideal for Australian themed projects, travel projects, masculine projects to name just a few. In my last post I focused on the gorgeous greens & browns in the range to team up with my Rain forest & flora photos. Today I focused more on the rich reds & browns to work in with my Autumn themed photos & the absolutely gorgeous leaves from the shop.
I have used a rich red/brown patterned paper from the range as my base paper. I gently distressed the edges then inked with Tim Holtz distress ink.
I then chose a lighter piece of patterned paper & created a large scalloped circle die cut using my new toy...a Lucky 8 punch from We R Memory Keepers. Basically these punches allow you to create a large die cut just by punching each corner or your page, you then flip your page & punch four more times.
At this stage we don't have these in the shop, but I can tell you Liz loves them too! So, watch this space!
I used Tim Holtz Distress ink -Walnut stain & Antique linen to darken the die cut to help bring it all together.
I kept this layout pretty simple, I added my photos, a journal tag, a rub on, some pearls & the gorgeous Autumn leaves.
I also gently sanded the edges of my photos. I like to do this sometimes, as the photos can look to crisp against all the warm tonings.
I have made a couple of gift tags using the tags from the Specialty paper die cut sheet. Sometimes you need a little tag for a gift that maybe for a male or someone who isn't in to pretty or fussy bits & pieces. So these are perfect. I just layered the die cut tags on to patterned paper, some more distress inking, some gorgeous ribbons, pearls & staples.
Hi Everyone. Lisa here. Today I have some pretty cards to share made using an absolutely gorgeous range from Authentique called 'Delightful'.
This range is very pretty & whimsical at least that's my take on it! Christine recently made some fabulous Easter cards with this range & it would also be great for any spring themed projects. Now that's a versatile range!
My first card is a Centre step card, so easy to make! Decorated with lots of layers of patterned paper from the range, pieces from the sticker sheet, punched borders, flowers, ink, string & bling.
Next up is the ever reliable Easel card, great for when you just want something a bit fancier than your standard card. Decorated with lots of layers of patterned paper from the range, pieces
from the sticker sheet, punched borders, flowers, ink, ribbon, string &
bling.
A close up on a different angle, so you can see the embellishing.
I couldn't resist making some sweet little tags with some of my leftovers! So quick & easy and great to add to your stash when giving just a little something.
I die cut some layered hearts using my cuttlebug. I inked the edges for definition, added ribbon string & bling.
Make sure you check out the fabulous range of ribbons we have in store,the beautiful pink & green snippetes you can see on my cards today are Green Tara ribbons.
Hi Everyone. Lisa here. Today I have some cards made using one of Echo Parks' ranges called "Victoria Gardens". Do you ever find that you really love a particular range so you order it (well in this case ask Liz for some..lol) then you get it & try to create & it just doesn't happen for you? Well that happens to me sometimes. As frustrating as it is it's not about the beautiful paper its about finding out how YOU work best with this paper! I know its not the gorgeous paper as thousands of other people around the world have created gorgeous projects with it! I know - I googled it! Hmmm.....I hope someone knows what I'm on about, I'm not just a crazy lady!
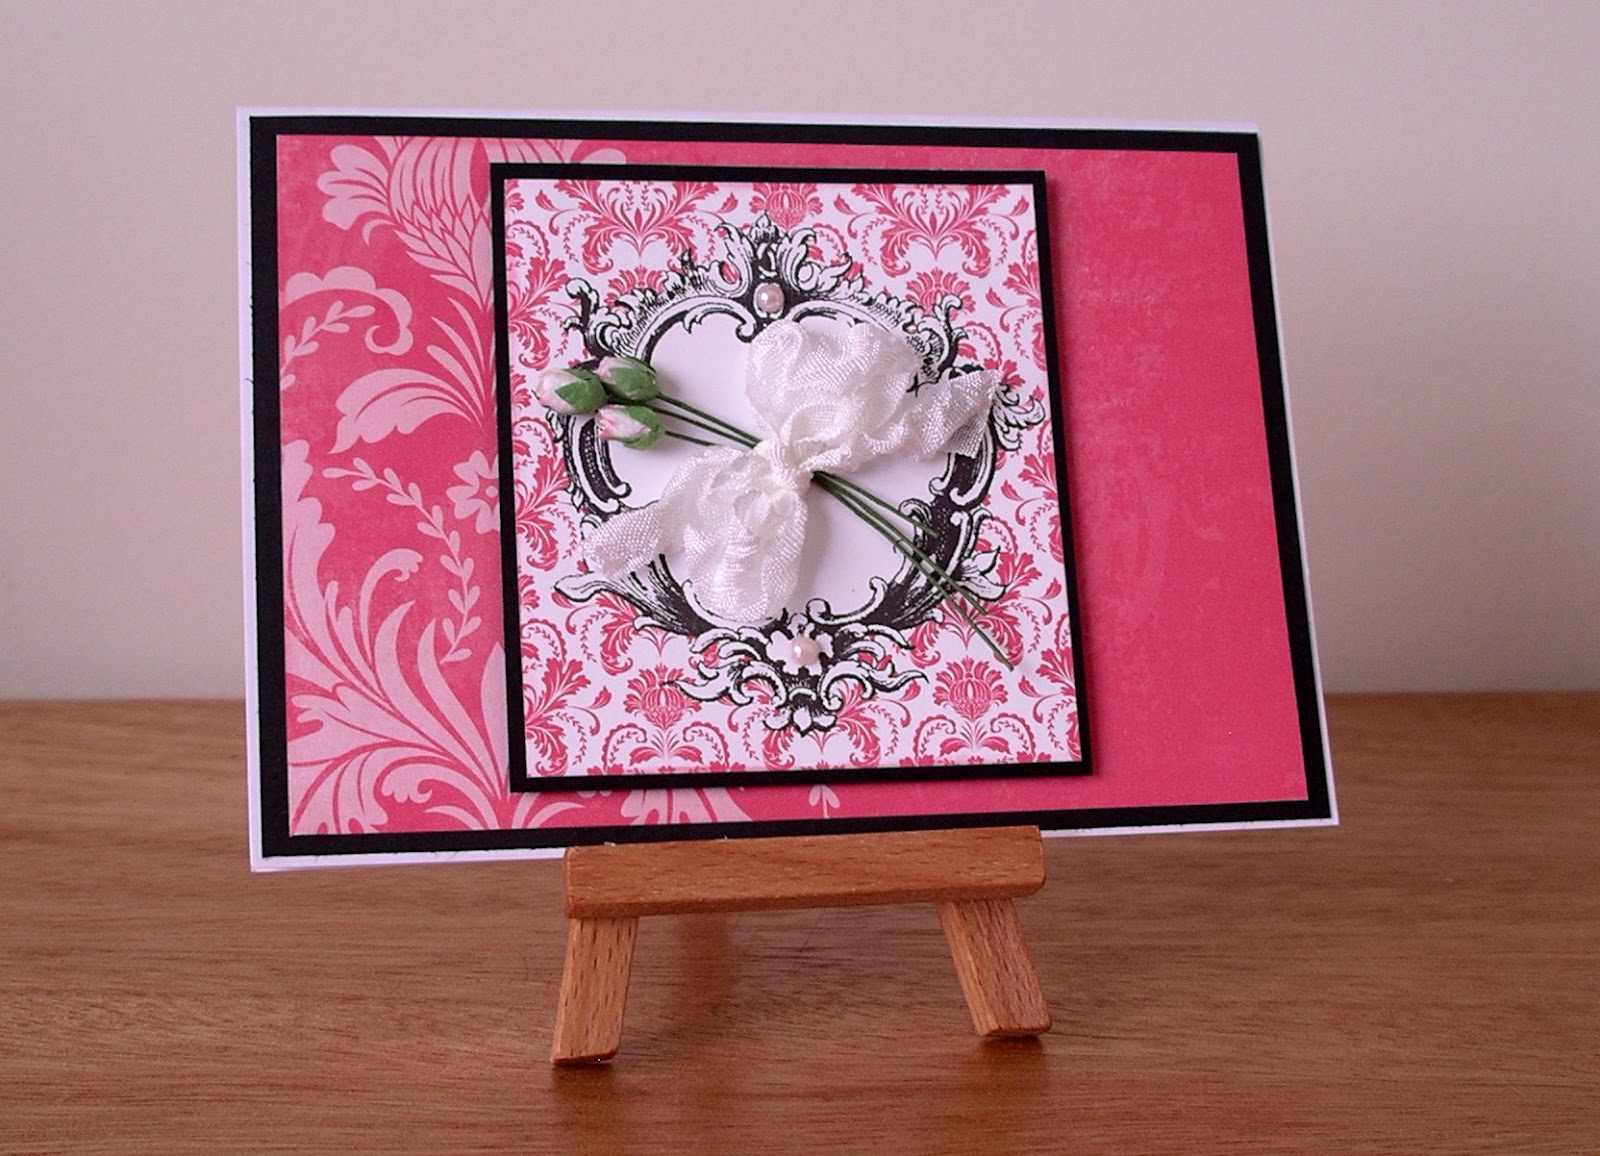
Here is my first card. For me getting the paper to work for me was was about adding black, yes black as a base & contrast! Why didn't I realise that earlier...I don't know. But, when I did finally figure it out I loved the look. I have made this a centre opening card & then the extra panel is stuck on to one side but sits central when closed.I kept the card pretty simple by layering & mounting, slipping the black in between. A flower, some wire, tag & a pearl.
My next card I started with landscape base then mounted by alternating the black card & pink patterned paper. I added some flowers,pearls & seam binding to complete the card.
Next up is an even simpler card, lately the simple clean look is my thing. Maybe a bit hard to see in the photo but I embossed the black base using a embossing folder in my cuttle bug. A Swiss Dot folder which is my favourite. It adds texture to the card without too much fuss. A pink panel of patterned paper, a piece from the journal sheet, some bakers twine, a brad, pearl & simple sentiment stamp.
Here are some small gift tags I made whilst I had the paper out, I hope you like them.
I very rarely get my scrapping stuff out & just make one card or layout, I need to make the most of all the bits & pieces whilst they are out. Otherwise they get put away perhaps never to be seen again.
When you're stuck where do you go for inspiration? For me its the internet & magazines. Do you have paper in your stash that you have struggled to create with? What works for you? We love to read your comments.
Have a great day.
Lisa
P.S. Don't forget about Centre Stage If you don't know what I'm talking about you better check out the link!
2 SLEEPS TILL CHRISTMAS!!! Just a wee reminder in case you'd forgotten.
Here's my idea for tags. Really easy - I just used my Spellbinder shapes through the cuttlebug onto some gold cardstock and folded them in half. Then I added some ribbon and a die cut picture. You can just attach them with some double sided tape on the back.
My children also wanted to help me, so I gave them luggage tags and they covered them using torn scraps and some stickers. They had heaps of fun. I might get them to do all my tags next year!
I'd like to wish everyone a very special Christmas and safe holidays. Take care!
Clarissa